Stewart Liesnham, Author at

Author Archives: Stewart Liesnham

New Strategic Partnership

Posted on September 16, 2021 by

Web-Feet are excited to announce our strategic business partnership with full-service digital growth agency, Damteq. 

We are thrilled to be partnering with another experienced, established and recognised agency in Hampshire. Damteq are growth-focused experts in our industry, offering a full range of digital services with their people-first approach. 

Web-Feet have been looking for strategic ways to expand our range of services and depth of talent since 2019. With such a diverse and ever-expanding marketplace for services in the digital space, we knew that a partnership with another agency could complement the services we already offered. 

In early 2020, we met with Damteq for the first time. From our first conversation with Managing Director and Founder, Adam Smith, we felt that we had found the perfect partner. Damteq’s humanistic and honest approach to business aligns with our own values and it was clear that a strategic partnership would benefit all involved. 

Since then, we have both had to navigate the pandemic and decided to delay our partnership. Web-Feet are now proud and excited to say that we have completed the groundwork and will now commence working closely together. 

Stewart Liesnham, General Manager of Web-Feet said: “As a business, Web-Feet have always aimed to provide an exceptional level of service to our clients. We wanted to find an agency that shares our values and has the in-house resources and experience to really support our client base with extra services and ongoing growth strategies. When we started discussions with Damteq we immediately felt that we’d found the perfect partner. We are really excited to officially start our strategic partnership and extend our service offering to our well-established clients.” 

Our partnership with Damteq will allow us to expand our range of services for our clients and give us access to a broader pool of digital talent, with experts in every niche and speciality. 

Essentially, not much will change with regard to our existing services and points of contact. The core team at Web-Feet remains very much the same. What we will be doing is reaching out to you all to explore new and exciting opportunities together. 

Adam Smith, founder of Damteq said: “Over the years we have worked extremely hard on growing our brand to become a thriving people-first growth agency. Our strategic partnership with Web-Feet is an exciting opportunity that will help strengthen every area of both businesses. We look forward to being able to offer our growing range of innovative digital solutions to Web-Feet’s clients. This partnership is only the beginning of our growth strategy over the coming years.

Our whole team is excited about the opportunities the partnership will bring and are grateful for the chance to onboard an experienced local agency to the Damteq family.” 


The Website Design Process: A 10 Step Guide

Posted on April 3, 2019 by

website design meeting

Following on from our popular article – The Website Development Process: A 6 Step Guide, we thought we’d cover the Website Design Process in a bit more detail.

Collect ideas

There will be a strong temptation to dive right in and start designing things for your client so that you can demonstrate you are keen to progress the project. Resist this temptation and take some time out to collect some outline ideas of what it is you are trying to achieve. Ask your client if they have collected ideas on what sort of design layout and feel they want for their new website design. Do they want a clean professional look, something cool and funky, something more functional with a specific layout or search features or specific filters for e-commerce etc. Ask your client if they have seen other sites that they liked, and also disliked. This will give you a good idea of the sort of website design to aim for.

Logo design (if required)

Your client may already have a logo for their brand or business, in which case you can skip this step. If they do have an existing logo then you will want to incorporate the ‘feel’ of this into their design. You will of course also need to know the colours that are being used in the logo. You can use these as a basis on which to allow the colours to flow nicely throughout the rest of the website. Brand is really important so the new design should focus strongly on your clients brand.

Home page mock up

First of all you will want to design some static mock ups in Photoshop (or similar) and share these with your client. Focus only on the home page at this point because until you’ve nailed this aspect of the design there is little point spending time on any other internal page mock ups – unless you are very sure you’ve likely nailed it already. It’s worth setting up a sub domain of your own website to show off your mock ups, such as client.domain.com/client1 – this is a nice professional way of sharing your ideas. As your web design work will not be responsive or interactive at this point, be sure to let your client know otherwise they may not be too impressed!

Once your client is happy with their new design, make sure you have a formal sign off process. Nobody likes to talk about money but as a designer, time is your business and how you earn money. So any future changes are going to take you a lot of time to go back and rework so just make this clear to your client so you know where you both stand.

Internal page mock up

With the home page design signed off you can move on to designing your internal pages. There may be a number of different templates to design but they may follow the same look and feel. Focus on the key layout or layouts and present these to your client for sign off and approval before moving the project on.

Category page (e-commerce)

If you are working on an e-commerce project such as Magento for example, you will want to create some Category Page mock ups. You should already have a wireframe or sitemap to work through from the pre design stage of the project so you will know what category pages you are designing. This is where layout and functionality come into play with your web design work. You are now having to balance design flare with good UI and page layout first and foremost. Take some products or product details from your client and mock up the category page for your client and this will help steer your web development team once the design is cut up and wrapped around your chosen e-commerce platform. Again, ensure you have a formal sign off with your client.

website design product page

Products page (e-commerce)

This is the next level down the stack in terms of e-commerce web design. Your product pages need to look nice, be functional and have great UI. Think about your favourite e-commerce websites and how they are designed and presented to the user. Be sure to take any product variations into account and how these might be presented to the user in a nice clean interface. Don’t forget to get it signed off….

Check out page (if non standard)

Not the final, final step in e-commerce design but a critical part of it anyway. The e-commerce check out is leaning the most towards function rather than design but it still needs to follow brand. In fact, this is really important as you want a clear association with your brand throughout the entire website design process. As this is where your website user is parting with their money, you want to make sure they are still enjoying the experience through well thought out UI and page layout. You know what I’m going to say…. client sign off!

Contact page design

An often overlooked part of a website but probably one of the most important, especially if you are using funnels or just want to encourage website users to get in touch – which you should! This page needs to be clear, easy to use and understand – especially important if there are lots of options. It should of course represent your brand so make sure that is featured. I guess what I’m saying is don’t skimp on design for your contact page. It’s likely to be one of the busier pages on a website so make sure it does your client and your website design justice!

Rest of pages signed off

With everything taken into consideration in the points above, make sure any other pages your are designing are part of your workflow and sign off process. Stay organised with your website design process and reap the rewards of smooth workflow and happy satisfied clients.

Designs cut up and project moves to development

Now all your designs and templates are signed off, you can hand the project over to your web development or e-commerce team to cut up the design and wrap them around your chosen CMS or e-commerce platform.

Web-Feet are a Digital Marketing Agency near Southampton in Hampshire in the UK. We specialise in Coaster CMS website design and development. Our e-commerce platform of choice is Magento and we can offer a full suite of Digital Marketing services. We specialise in actionable, data driven SEO practices to ensure we deliver results based on real data and not guesswork. If you want to get in touch to discuss any of our services, please do. If you enjoyed this post please feel free to share it and leave comments below. Thanks for reading.


Support for Magento 1 is ending soon – upgrade to Magento 2 now

Posted on March 30, 2019 by

Magento 1 support ending

Magento is one of the world’s most popular eCommerce platforms. It’s estimated to power a third of all e-commerce websites on the internet. Magento is great for both web developers and business owners as an open source system with built-in e-commerce tools and fantastic official support.

Magento 1 has been continuously updated and upgraded over the years, with numerous patches and updates. These updates have enabled website owners to keep their version of the software up to date with the latest functionality whilst maintaining a secure site.

In November 2015, Magento 2 was released as an upgraded Magento platform with some major changes and fantastic new features.

What makes Magento 2 different?

Magento 2 isn’t just an upgrade: it’s a completely new piece of software. Think of it as a rebuild of the entire Magento platform from the ground up. If you want to find out more about new M2 features, we’ve already written about the differences between Magento 1 and 2

This means that moving to Magento 2 involves a complete website rebuild, which isn’t as straightforward as applying a patch or an upgrade.

When will support for Magento 1 end?

After announcing the release of version 2, Magento announced that support for version 1 would be ending. This allows Magento developers to focus on developing the new version of Magento, ensuring that it offers the best possible functionality, new features and security.

Initially, Magento provided a cut-off date of November 2018. Every store running on Magento 1 would need to have been upgraded by November 2018.

This was the original date at which Magento would stop releasing security updates. Merchants with a v.1 Magento site would be left susceptible to hacking and security breaches.

The announcement of this cut-off date created panic in the Magento community, as suddenly Magento developers were in short supply.

Magento finally acknowledged that this was an impossible task for Magento developers and website owners, as there simply weren’t enough Magento developers to cope with building the number of sites required within the original timeframe.

Thankfully, Magento decided the original the cut-off date was to be abandoned.

As long as version 1 security updates are applied as they are received, your site will remain secure and up-to-date for the time being.

Whilst this is reassuring for site owners who are yet to upgrade to Magento 2, it’s important to remember that this is just an extension of the deadline and that the end of support for Magento 1 sites is fast approaching.

Latest Magento Update

Magento announced in September that the cut-off date for Magento 1 support will be June 2020.

Magento will not support Enterprise or Community Edition customers after this deadline. The only support will be unofficial support from within the Magento community. This would leave any Magento 1 site owner vulnerable, therefore we urge all Magento 1 merchants who haven’t moved over yet to do so now.

If you are the owner of a Magento 1 site and are reading this, you should seriously think about upgrading to Magento 2 ASAP.

What steps should your business be taking now?

The upgrade process isn’t simple and could take a few months to complete, even for the simplest sites. It’s important to have a plan of action now to ease your transition. It’s also important to make sure that upgrading to Magento 2 doesn’t affect your site’s SEO, which could lead to a drop in traffic and sales. Setting your Magento 2 website up for good SEO is very important and needs to be done with a full understanding of how your specific site is set up. It also needs to be done before your new site goes live or you will likely be causing significant crawl problems and your websites ongoing SEO will suffer.

Our skilled Magento developers and digital marketing team are well equipped to deal with any e-commerce transition over to Magento 2. We aim to support our clients throughout this transition, ensuring that everything runs smoothly throughout the process. We especially focus on your SEO, researching all your current rankings and popular pages to ensure your rankings are moving over with your new site in a structured and planned way.

There is high demand for Magento developers right now, so it’s vital to book your slot before it’s too late!

Need some advice from Magento experts?

Web-Feet is a full-service digital agency based near Southampton in Hampshire, UK. We specialise in e-commerce website development, with an in-house team of experienced Magento developers. We are also specialists in data-driven SEO with a focus on actionable data and strategies.

If you’d like any further advice on upgrading from Magento 1 to Magento 2, feel free to get in touch.


2019 Online Marketing Checkup for Small & Medium Businesses

Posted on January 10, 2019 by

laptop and stethoscope

Time for your online marketing checkup!

With 2019 now upon us it’s time to do a quick check of your online marketing assets. This is designed to be short and snappy but you will almost certainly find something useful.

SEO – Check your search engine rankings in Google

Put your browswer into incognito (Chrome) or private mode (Safari) and search Google for your main keywords or phrases. If you aren’t ranking on page 1, it’s time to take action! There are some free tools that do this but I’d recommend a manual check for this one-off instance.

Website technical – Check your online forms are working

Go to your website and complete all your online forms to check they are all working as expected. If any are broken or end up in your spam, take action to fix them right away so your don’t risk missing any enquiries.

Website technical – Audit your website for technical issues

Go to ScreamingFrog and run a site audit of your website. It’s free and will give you everything you need to know with regard to any technical issues that you have with your website that are negatively affecting your SEO. Fix these asap!

Website design – Look to see how your site compares to your competitors

How does your current website stack up compared to your competition? Is yours looking tired or old? Many visitors are put off by old or dated looking websites so be critical and take steps to improve or redesign it if necessary.

Responsive web design sign

Website technical – Is your site mobile friendly?

Use Google’s mobile friendly test and check that your site is mobile friendly. If it’s not then this is a problem that you need to fix right away as it’s a key SEO ranking factor for Google. It’s also very important that your site works well for anyone visiting your website on a mobile device (obviously!).

Branding – Is your branding consistent?

Check your branding across all your online and offline assets. Are you using the same branding and logo across your social media accounts, website, printed material, sign-work, vehicles etc? If not take action because your brand is important.

Website UX/UI – Audit your website user journey

This might sound arduous but it’s not. Put yourself in the shoes of a website visitor and check that they can easily navigate your website and get to everything quickly and easily. Also make sure that you have plenty of CTA’s (Calls To Action) on the key parts of your site.

Website SEO – Check your website speed

Use Google’s Page Speed Insights to check how your site performs across all platforms for speed. If you are getting a slow score for either Desktop or Mobile, or both, then take action to fix it asap.

Website SEO/Technical – Set up Google Analytics and Google Search Console

Hopefully, you already have Google Analytics set up on your website but you should also have Google Search Console set up too. Follow the links above or Google it and then follow the setup instructions and check out the user guides.

SEO – Optimise your Page Titles and Meta Descriptions

Find out who’s ranking well for your keywords and see if their page titles and meta descriptions are more interesting or engaging than yours. Also check your keywords are there. Click through rates are higher for well written titles and descriptions and this is a key SEO ranking factor.

Summary

Running through the points in this checklist will serve you well. You will be able to start the year off knowing that you’re in good shape online.

As always, we welcome your comments and feedback – just leave them below and we’ll get back to you. Otherwise, we hope you found something useful.


Best SEO tips for Magento 2

Posted on December 30, 2018 by

Ecommerce merchant packing products

Improve your Click Through Rate (CTR)

What are the best SEO tips for Magento 2? This is a big chicken and egg – let me explain why. A higher CTR will improve your rankings but obviously, you need higher rankings to get clicks. This means that you need to be thinking about your CTR from the outset which is why I’ve listed this section first.

Put yourself in your customers shoes

Everything you do with regard to your website has a direct impact on your CTR. You need to be thinking from the mindset of a customer from the outset. Hopefully, you did this when you built your website in the first place but if not, now’s the time to revisit this. You’ll hear the term ‘reducing friction’ a lot with regard to product or service.

This is where small things count so pay attention to the detail and remov anything that is ‘annoying’ as you work through the customer experience. Check things like navigation, site search, shopping cart process, contact forms – basically any user interaction. Check everything flows smoothly and the user intent can be easily satisfied.

Website Design

Ecommerce sites need to both look good and be as friction-free as possible. Clearly, there are multiple factors to consider when thinking about how to convert visitors to paying customers. Having an old and dated website is going to put a lot of potential customers off and also makes your products and services more sensitive to price.

If your site looks cheap and cheerful but you are charging premium prices your conversions are going to be terrible.

The other essential part of web design for eCommerce and good SEO is how your site looks on the many and varied browsing devices in use. Check your website regularly on as many different devices as possible. I say regularly because you are likely to be making regular changes to your website and sometimes things break unexpectedly.

UI/UX

I’ve touched on this above with regard to the user journey. This is essentially what User Interface (UI) and User eXperience (UX) is all about. It’s the experience that the user has when they are taking their journey through your website. This is often overlooked and irritating barriers can be put in the way of converting visitors to paying customers.

It is always advisable to have proper user testing carried out on your website but if this is outside of your budget, ask friends, workers or family to help out. Get them to use different devices too and give you some honest feedback regarding their experience. Dividing up the workload can help too so you can have different people checking different parts of the website.

A great example of great UI/UX is the Stripe online payment service. The entire process of entering your card information doesn’t even require you to use a mouse or tab key. It moves you along the entire process seamlessly as you enter your details. This is one of the key reasons they have become so popular in a market previously dominated by much bigger players.

HTML Sitemap

M1 M2  Magento HTML Sitemap Extension

An HTML sitemap is an important SEO ranking factor primarily because it improves the user experience. Magento does not support an HTML sitemap out of the box so you will need an extension for this. The example (image) HTML Sitemap Extension for Magento by Amasty above is one example of a Magento extension that allows you to add an HTML sitemap to a Magento eCommerce site. BSS Commerce also offers a Dynamic HTML Sitemap extension for Magento.

Magento Page Titles and Meta Descriptions

Magento does most of the heavy lifting when it comes to generating page titles dynamically from your product information. This applies to the product pages, but for all other pages, it pays to better optimise. The best SEO for Magento, or indeed any website, involves research. Find out which of your competitor sites are ranking better than you (for your chosen product or keyword) and dig into their page titles and meta descriptions.

The sort of questions you should be asking yourself are:

Are theirs more engaging than yours?

Are theirs providing more relevant information?

Do this research for your home page, category pages and landing pages. It will take some time but this hard work will pay off with better rankings. There are many tools to help with this but Google itself can give you a lot of information from their existing search tools.

Canonical URL’s

I’m not going to get too far into the technical or configuration aspects of this but will link to a great article on these aspects in the Technical SEO for Magento 2 section below. When you have pages on your website that are duplicates for product variants then you need to use canonical url’s. Magento config settings cater for this but you need to make sure these are set up properly. Basically, this is just telling the Google search bot that one page is the main or primary page and the others are secondary and shouldn’t be indexed.

Racing car - optimised for speed
Optimised for speed!

Speed Optimisation

For the best Magento 2 SEO setup, you want your site to be as fast as possible. Magento has some built-in options around caching, but there is a lot to be said for using services available from the likes of Cloudflare. This will allow you to optimise code and images using content delivery networks. This will make your site much faster in many ways and improve the user experience overall.

Technical SEO for Magento 2

It’s not my intention to cover all the technical SEO aspects of SEO for Magento as that’s an entire topic in its own right. It’s a highly configurable solution but it also has a few things that can be frustrating to set up and configure optimally.

Like all things SEO however, it’s all about attention to detail. There is an excellent article, The Definitive Guide to Magento SEO that covers all these technical aspects. Many of the points covered in this article will need developer time but they are also very important to understand and adopt if you want to get the Best Magento SEO setup for your eCommerce website.

Getting the best out of your website takes time and effort and I hope that this article helps with that process. As always, I hope you found this article useful and welcome comments, feedback and questions as always. Happy SEOing.


301’s, 404’s and Search Engine Optimisation (SEO)

Posted on December 10, 2018 by

301 redirects

Why 301 redirects are VERY important for good SEO….

In this article you will find out what a 301 redirect is and why it’s so important. This is especially true when launching a new website. You will also find out the implications of not using 301 redirects properly and how that can destroy your rankings and website traffic.

What is a 301 (permanent) redirect?

A 301 redirect is basically a way to redirect one (old) url to a new url. There are several reasons why you’d want to do this but in this article we are talking in the context of a new website. To practically demonstrate a 301 redirect, click on the following link;

https://www.web-feet.co.uk/about/work

You will see that this will take you to this page on our website;

https://www.web-feet.co.uk/how-we-work

The first URL has a 301 redirect on it that permanently redirects it to the second URL. The reason being that when we launched our most recent website we changed the URL structure.

Why is a 301 redirect important for SEO?

Let’s use the scenario of having a new website built – and incidentally, this happens a lot.

You have had your website a while, built up some good page ranking in Google, you may have even paid for some SEO in the past. You are getting good traffic to your site and converting leads. As a result you want to further invest in your online presence and you have a new website built.

Website launch day!

Your new website goes live and it represents everything that you wanted. It looks great and you can’t wait for your existing customers to see it. You also know that it’s way better than your competitors’ and you wait for new leads to come rolling in.

Except they don’t.

You check your Google Analytics and your organic traffic has tanked.

seo rankings going down

You do some searches in Google and you are still listing well but when you click on the link you see this;

The dreaded 404 page! (I mean hopefully you don’t see our 404 page because then something very wrong has happened with your website)

What happened?

When your new web company built your website, they totally disregarded what was already there. Yes you got the nice new website that they promised but they did nothing to transfer all your old URLs and search data to your new website. They say they’ve done their job – you have a new website. You are left crying into your 404 page error and flat lined organic traffic report.

All, or maybe just some, of your valuable past SEO efforts and page rankings have just gone up in smoke.

If this has just happened to you – don’t panic.

If this has just happened to you, it’s not too late. You can rescue the situation, or at least limit the damage if you act quickly. It’s beyond the scope of this article but you will find help online, it’s not a unique problem. Whilst a bit technical, this MOZ article – Recovering Your Organic Search Traffic from a Web Migration Gone Wrong will help you out.

New website – plan ahead.

If you are having a new website built, make sure you, or your agency, take proper care to plan your migration from old to new website. You will want to research all that was good about your old website and the positive SEO results and ensure this is all reflected on your new website. This takes time and effort but it can steer you away from catastrophe.

Specifically, with respect to URL structure, make sure all old URLs are pointing to it’s closest cousin on your new website. It’s best to not change the URL structure too much if possible. Nevertheless, you will almost certainly change at least some.

How do I set up a 301 redirect?

WordPress

With WordPress, you can use a plugin to create 301 redirects. If you are using Yoast you can consider using their premium SEO plugin which will handle 301 redirects. This article How to create a 301 redirect in WordPress explains this in more detail.

Coaster CMS

With Coaster CMS it’s really easy to set up and manage 301’s because there is a page within the site admin to enter before and after URLs. It’s really easy and we added this feature because we like to make life easy 🙂

Any other CMS…

Google it!

new website and seo planning meeting

SEO Migration – bonus section!

I touched on this above, but to expand..If you are having a new website built. Take some time to map out your old URL structure (site map) and plan out your new one. A spreadsheet is good for this because you can copy and paste from your HTML sitemap. Make sure that all the old URLs are either maintained or redirected to one of the new pages.

Once you have this complete. Do some keyword research on your current page rankings. This is especially important if you are changing or updating content. 

You want to find out which keywords your current site is ranking for and for which pages. Now you want to find your most valuable pages and keywords (you can do a lot if not all of this in your Google Search Console). This in turn tells you which is your most valuable content. Be mindful of making this content better but not changing it too much at this stage. At this point you want to focus on maintaining all the good rankings you have.

Anything that’s not ranking well can be updated more freely.

Summary

You are now up to speed on 301 redirects and why they are important for SEO. You know how they should be used and how you can preserve all your good SEO and rankings when moving to a new website.

I’d love to receive your comments and questions and hope that you’ve found this useful.


Local SEO Hampshire

Posted on December 7, 2018 by

local seo hampshire search on mobile


As I said in my recent article on Local SEO – 7 Step Guide to the Best Local SEO – 46% of all searches on Google are local.

Local search is critical to your business and is only going to get more important as search and Google shift more towards mobile.

What is this article about and who is it for?

You may be asking why Hampshire? If your business is based in say, Surrey, that’s fine, this guide is also for you but I needed an example county. Seeing as I’m in Hampshire, that seemed like a good place to start.

Who’s it for? Well, anybody that has a website and wants to understand how search, and in particular local search, works with Google. This will allow anyone to perform some basic search engine optimisation specifically for, in this case, SEO Hampshire.

Your two primary considerations wrt Local Search

Number 1 consideration – Google’s Local Pack & Google My Business

Your business is almost certainly in a town or city, let’s use Eastleigh as an example throughout this guide. No surprise, that’s where Web-Feet is based. Eastleigh is a town in Hampshire with a population of around 130,000, roughly 10% of the population of Hampshire – just to put things in perspective. If you are from much further afield and have no idea where I’m talking about, welcome! Hampshire is in the UK, on the South Coast of England.

Google Local Pack

When you search for a product or service on Google, you will quite often get served up some ads There are at the top of the page, followed by what’s called the Local Pack. An example of which is below. In this case, there are two ads followed by the Local Pack. Underneath the local pack are the Google Organic Search Results.

Search results for landscaping services in Google

Now, see how I just searched for ‘landscaping services’ and not ‘landscaping services Eastleigh’, or ‘landscaping services near me’? Google is smart and I wasn’t even using my mobile. You can see that it has placed me on the map by way of a small blue dot just underneath where it says ‘Chandlers Ford’. Whatever device you are using, Google knows where you are. Or has a pretty good idea and gives you relevant search results. A few years ago, you would have had to have been more specific with your search queries. Now, you don’t need to be. In fact, you probably haven’t even noticed because most people have adapted to the new way of finding things online.

Google My Business

If you provide Landscaping Services in Eastleigh you will want to be listed in the Local Pack. The main reason being that it’s below paid ads but above organic results. This is your first consideration with respect to Local Search. I’ve covered this in a bit more detail in my article  7 Step Guide to the Best Local SEO. To get straight to it with Google you can go to the Google My Business page. Here you will be able to complete the whole process or update your existing listing. Without covering the whole process, my advice would be to be as thorough as possible and make sure that your NAP (Name, Address and Phone number) are entirely consistent wherever they are listed. Google will get confused otherwise and you won’t get the full benefit of the listing.

If you need any help with SEO - don't forget we can help

Number 2 consideration – Letting Google know the area your business covers

So now your Google My business is set up, let’s move on.

Let’s say you are a landscaping business in Eastleigh and you’re listed in the Local Pack. That’s great, but Eastleigh isn’t that big a place and your business covers the whole of Hampshire. This actually presents your business with a bit of a challenge. Anyone searching Google will always be served up a business local to them in the Local Pack. Someone doing the same search above in Southampton  (a city just down the road from Eastleigh, population around 250,000), is going to find a landscaping business in Southampton, not Eastleigh. At least as far as the Local Pack results go.

Adwords (slight diversion)

To cater for this scenario you can consider running Google Ads, this will allow you to target specific areas for search. This will ensure that your business is placed at the top of search for very specific search phrases and in specific geographic locations. Google Adwords is beyond the scope of this article however.

Letting Google know the areas you cover

Now whilst the Local Pack is important and you want to be listed here for local searches, underneath is where the organic search is. In order to rank well here, you need to optimise your website for, in this example, landscaping Eastleigh, landscaping services Southampton and landscaping services Hampshire. The temptation here is for businesses to build a page for each location they service but then go on to duplicate all the page content because it’s the same service, just in a different location. I would advise against this although you will still see this strategy in use. This approach is a bit dated and the problem with trying to unnaturally game the system is that Google makes the rules. Essentially, the more natural your approach to this the better. Always keep real people in mind. Don’t try and second guess what a computer thinks.

If Google decideds clamps down on the use of this tactic, your entire online business is instantly compromised. You would need to make some significant changes to your website to address (sorry no pun intended) this. You need to be smarter than this because Google doesn’t like duplicate content and to be honest, neither should you.  It’s just not adding any value to your visitors.

How to let Google know the areas you cover

Let’s do that search for landscaping services again but add a location to our search this time

Search for landscaping services hampshire in Google

You will see that the ads are now gone, which presents an opportunity perhaps but that’s not in the scope of this article.

Let’s break this down a bit. The local pack is still showing services local to me, as expected. Looking down at the organic search results however and you will see two businesess that have made it clear to Google that they cover Hampshire. Equally, it’s clear to the person searching that they cover Hampshire. This is exactly what I’m talking about. It’s hard to see how if you carried out this search you’d not click on those two websites to investigate further. This is exactly the outcome you want as a business listed on Google.

How to make it clear the areas you cover

Let’s say that you had 2 minutes to pitch your business to an audience in person. You’d almost certainly cover the following topics;

  • What your business is called
  • The services you provide
  • Where you provide them
  • What makes you special
  • Something about yourself

On your website, you obviously need to cover all of these points, and much more, too. Focussing on where you provide your service, make this very clear on your website. For example;

  • Where you are based
  • What areas you cover
  • Provide a map if that’s relevant
  • Showcase work you have completed with details of where you completed it
  • Show testimonials of happy customers and make it clear where you carried out their work

Basically, take every opportunity to say what you do and where you do it.  This makes it clear to both your visitors and Google. That way, your website and business will be properly associated with all of these things. Google will list you accordingly and you should receive good quality click-throughs to inquire about your business. Each of these clicks is valuable and hopefully, you can convert them into a sale.

On page SEO – some techy tips

Don’t forget that Page Title, Meta Description and other on-page areas are all places that you want to make your geographic business coverage clear. Going back to the example search above, you will see that Hampshire is mentioned in the Page Titles for both of the ranked pages in all four top positions. It’s not just this Local SEO factor that will get them this listing but it is a factor. More importantly, to the person looking at the search results, it’s clear to them that they are relevant to the search term they used.

That brings this article to a close. I hope you found it useful. If you have any comments or questions please leave them in the comments below and I’ll get back to you.


7 Step Guide to the Best Local SEO

Posted on November 29, 2018 by

Search magnifying glass

Local Search and appropriate Local SEO is important.

Here’s why – 46% of all Google searches are local

Below, I will share with you the top 7 best strategies to optimise your website for local search and in fact good SEO generally.

1. Nail your keywords (the heart of good SEO)

Keyword research is very important for your SEO and therefore success online. Never assume that you know how people find you online. Sign up for a free trial with either SEMRush, MOZ or ahrefs and this will do a lot of the work for you. Yes, this will be a steep learning curve but you will uncover a lot of useful information. They all have a ton of helpful guides to get you started. Keyword volume is absolutely critical to understanding where there is search volume. Next, you need to know who’s currently ranking well for these higher volume keywords. If you supply niche products and services you can benefit from a higher conversion rate with lower volume keywords. Otherwise, search out keywords that have some volume and try appending your local area to the search. This way you will see what keywords are generating the volume in local search. Once you have a good handle on your keywords you can use that information to find out who is ranking well for them and delve into how they’ve achieved that.

2. Complete EVERYTHING in your Google My Business account

Listing well in Google’s local pack is very important for local search success. It’s tempting to just enter the basic information and make a mental note to go back and finish it off later. Don’t do this. Fill in everything you can as comprehensively as you can. This is the next best thing to free AdWords. The local pack sits between paid ads and organic search so a good placing here is extremely valuable. Google ranks knowledge highly so a well-written description of your business, it’s products and anything else valuable, like some photo’s, is a must. We’ll talk about reviews below but also make sure you keep on top of any you have already. Everybody knows that things go wrong sometimes so make sure you reply constructively to any negative feedback. It’s how you deal with these things that matter.

3. Put a strategy in place to get more Google reviews

Building upon point 2 above, to really nail your local SEO, you need to build trust with Google as well as your customers. There is no better way to do this than get some good reviews and bake this into your business strategy going forward. Ask any recent customers for a review and then put a strategy in place to ask all future customers too. Making this as friction-free as possible for your customers is a must. Use the tools on Pleper to help with this. You can use their Google Review Link Generator to create a short URLs to email or print on business cards along with a QR code inviting reviews. This will take your customers straight to the review card where they can rate you and leave a review very quickly.

Goal, target audience, content artwork4. Research who’s ranking well in Google’s local pack and check their local citations

So now you’ve got your Google My Business listing all done and you are getting regular reviews it’s time to see who’s on top. Search for your products and services online and see who’s listing in the local search box. If you’re not there you have some work to do. Local citations are from directories that list products and services by geography. Whitespark have a Local Citation Finder that will do all the research for you. It will list all the citations from all the people ranking well in the local pack. Once you have this information, you can spend some time listing your business on the same directories. This will likely take a while but it’s time well spent. Some of the directories may charge a listing fee but before you do this, find out how valuable that link is first. Whitespark will rate each citation so only consider paying if the citation has a high rating. Alternatively, do all the free ones and wait and see how this works for you over the next few weeks or months.

5. Audit your website with a special audit tool

If you are serious about nailing your SEO yourself then you have hopefully signed up to one of the services mentioned in section 1. All of these will allow you to carry out an audit of your website in order to improve your SEO and SERPS. The audit will basically pick up anything that’s suboptimal for SEO as well as anything more serious. This process can sometimes be daunting because the volume of errors can be significant. That being said, you can resolve sometimes hundreds at a time with just one simple fix. Other issues such as missing alt tags on images can just become a process of longer-term resolution. It’s unlikely you will fix everything straight away, or even quickly. Don’t be put off, just keep chipping away and everything you do will start to work in your favour. This will translate into better rankings over time. Be patient and don’t expect miracles.

picture of spanner and hammer6. Fix any errors or problems on your website

The tools you are now hopefully making use of are powerful. They are also well established and as a result all have a ton of useful information with regard to understanding and fixing issues. Granted sometimes this can be technical and daunting but don’t be afraid to ask for help or seek assistance from your developer here. Most of the issues are going to be one-off fixes or issues that you can avoid in future with your new found knowledge. The best SEO involves diligent attention to detail and the ticking of many many boxes. Over time, like anything in life, this diligence will pay off, in this case, with better rankings.

7. Write expert content and share it as much as you can

Now that you’ve done all the groundwork to ensure that your website is on a firm base, it’s time to think about content. If you have fixed all the issues with your website and it’s diligently optimised for local search, content becomes the next critical factor. Google, and just people on the Internet generally, value good content. Chances are that you are an expert in what you do. Share this information and you will be rewarded. You don’t need to give away your trade secrets or anything but remember that most of what everybody knows can be found on the internet somewhere anyway. Sharing advice and specialist knowledge will be rewarded with online interest, sharing and ultimately better rankings from Google. Share your content everywhere that you are likely to have an audience and over time you will see traffic increase. This will build your standing with Google and any online followers you have. Don’t try and substitute quality with quantity though. Make your content useful, unique and engaging. Like all things SEO, don’t expect instant results. Work hard at this aspect and good things can happen quickly but chances are you will need to be generating good content for a while before you start to see great things happen. Stick with it though because your patience will be rewarded eventually.

Summary

So that wraps up this article. I hope you found it useful. If you would like any help or assistance with website design, website development or Search Engine Optimisation please get in touch. We are based in Eastleigh in Hampshire in the UK so if you are in the Southampton or general Hampshire area you are more than welcome to come in and see us. We’d love to talk through your online business needs in person. We will be happy to suggest solutions perfectly tailored to your needs.

If you enjoyed the article, found it useful or have any questions or comments, please get in touch below and we’ll get back to you.


Customising search terms in Magento 2

Posted on November 15, 2017 by

Introduction to Magento 2 Search

Magento 2 search can sometimes be suboptimal when more than one search term is used. Your initial reaction might be that the search engine isn’t very good. However, using data collected from the Magento 2 admin and using some experience, the platform offers some great flexibility to customise and therefore optimise search results. The end result can be a much better user experience for your site visitors and hopefully a better conversion rate. To find out more, read on.

Considerations

Before we dive in, there are some key considerations before you start trying to customise your search within M2.

Understanding user behaviour

Offsite search

First, we need to take a step back from the M2 website under consideration and look at how the visitors arrive at your website in the first place. If you are using Paid Search Engine Marketing and Search Engine Optimisation for organic search, then the ‘searching’ has most likely been done BEFORE the visitor arrives at your website. Hopefully, they’ve landed on the right page to meet their needs. In other words, these users are arriving at the website on the product page they are looking for. As such, Magento search is less critical to this type of user. What is critical is ensuring you have a good Digital Marketing strategy to ensure these potential buyers are finding your products through search and landing right where they need to in order to purchase.

Onsite search

Everyone else that lands on your site, through more generic search terms or through your efforts to promote your business and products/services, may be better considered a ‘browser’. They land on your site because they are interested in what you have to offer but might not have a specific product or service in mind. This is the main target audience for optimising your on-site Magento search terms.

We’ll get into a specific example shortly. For now, I’ll show you how to find where you customise search terms in the site admin. So, when you are logged into your M2 admin, click on the Marketing tab and then under SEO & Search you will see ‘Search Terms’ – as highlighted in the image below. Select this option and it will take you through to the Search Terms page.

Menu path to select search customisation


The Search Terms page in the Magento 2 admin

When you select the option above it will open the Search Terms page, as shown below.

Magento 2 search screen

The purpose of this page is two-fold. First of all, it’s where all your user intelligence is to be found in terms of what people have searched for on your website. This is actual, real-world data and therefore a potential gold mine in terms of understanding users search behaviour. This page will show you the most recent search queries, how many results that query received and how many times it’s been used. You can filter the data by Uses so that the most frequently used search terms are shown at the top. Not only can you see popular search terms you can also see mis-spellings and other such data which you can use to provide a better visitor experience. There are two key opportunities here;

Mis-spellings

Within the search queries used, you may find things like common mis-spellings or people searching using singular (eg. fridge) when your products are only listed in their plural form (e.g. fridges), and vice versa. This is your opportunity to catch these and redirect them to the actual search results (products) they were looking for rather than no results which can be frustrating and result in visitors leaving your website.

Products or Brands you don’t stock

If visitors are searching for products or brands you don’t carry, rather than give them zero results in the search, redirect them to a Magento landing page that can offer them alternatives. This would be like going the extra mile if you were face to face with the customer. It shows understanding, great customer service and may result in a sale when otherwise the visitor would have just moved on.

Creating Your Custom Search

Here’s an example below of how the search term ‘black fridge’ returns unexpected results. Because we have two words in the search, Magento treats these as mutually exclusive. So, in this case, ‘black’ is being weighted higher than ‘fridge’. So items in the database that are ‘black’ are being listed above those that are ‘fridges’, the search terms are not being used collectively because that’s not how the search works in Magento. This makes sense if you think about it but also, Magento has provided loads of customisation options, which is the purpose of this blog post of course. It should also be noted that you can also ‘weight’ product attributes in Magento in order to optimise search too – that however is outside of the scope of this article.

To deliver better results for this search term we can set up a custom search term within the M2 admin. More on this below.

Search results for black fridge before

Having determined that this search terms doesn’t work as we’d like it to, we can add this as a search term in the admin as described. In order to do this, we need to determine a destination URL so that we can effectively override the search and direct that specific term to a specific page. Below I’ve selected the ‘Fridges’ category from the main site navigation. Then I’ve used the search filter on the left to select just the black fridges. This sends me to the page URL as shown below. Copy this URL to your clipboard and then we will use it to set up our custom search.


Filtered search for black fridges


If you now go back to the site admin you can create a New Search, this will display the following information. All we need to do is add the search query (in this case black fridge), select the Store View we want this search to apply to, and then add the redirect URL which we copied above. Click save. Please note that if the search query already exists in the database you will need to search for this on this page and then edit it – this only applies if you get a message to say that your search term already exists. As mentioned above, you can also set up a custom search for products or brands that you don’t carry. So if there’s a brand you don’t carry but you have some great alternatives – redirect that search term to a Magento landing page suggesting alternatives. You may make a sale when otherwise the visitor is just going to leave and go somewhere else. It’s also a great opportunity to share your knowledge with your visitors because you may have a much better alternative, this is your opportunity to say why.

add new custom search term

If you now go back to the main website and carry out the same search as before, you will get the results as shown below. Perfect!

customised search for black fridge search term

Search Synonyms

Search synonyms in Magento 2 is another way to customise search. This is a way to link related search terms but only applies to single words. If you have a single word search term that is commonly misspelt, you can link these by creating a Synonym. You do this by creating a list of words, separated by commas. When anyone searches for any of these words, they will all be linked to the same search results. These are especially useful for single search terms that can be misspelt. For anything else, there are the custom search options above.

How to Video

Here’s a video with a step by step guide that shows you how to do everything I’ve talked about above.

In summary

Successful websites are as much about the experience as they are your products and services. You want to get your visitors to what they want quickly and with as little friction as possible. This is why Magento 2 has these really useful features that allow you to fine-tune your visitors’ search experience. Now you know how this works it’s well worth spending time regularly, fine-tuning this part of your website.


Setting up the Kontakt Gateway + Location Engine with Proximity Beacons

Posted on September 26, 2017 by

Promotional graphic of Kontakt Location Engine

Introduction

This article will detail how we set up and used Kontakt’s Gateway + Location engine with Bluetooth Proximity Beacons – We’ve worked with Kontakt’s range of Bluetooth Proximity beacons for a while now but it was some time ago that we received our Gateways but never got around to setting them up, until now! Part of the reason for this has been that we’ve been really busy on customer projects and the other is because we thought it might take a while, this couldn’t have been further from the truth as it turns out.

So, we’ve set two Gateways up at our offices in Southampton in the UK and these are both subscribed to Kontakt’s Location Engine. Here’s a summary of how to set them up and what you can do with them. But first…

What is a Kontakt Gateway?

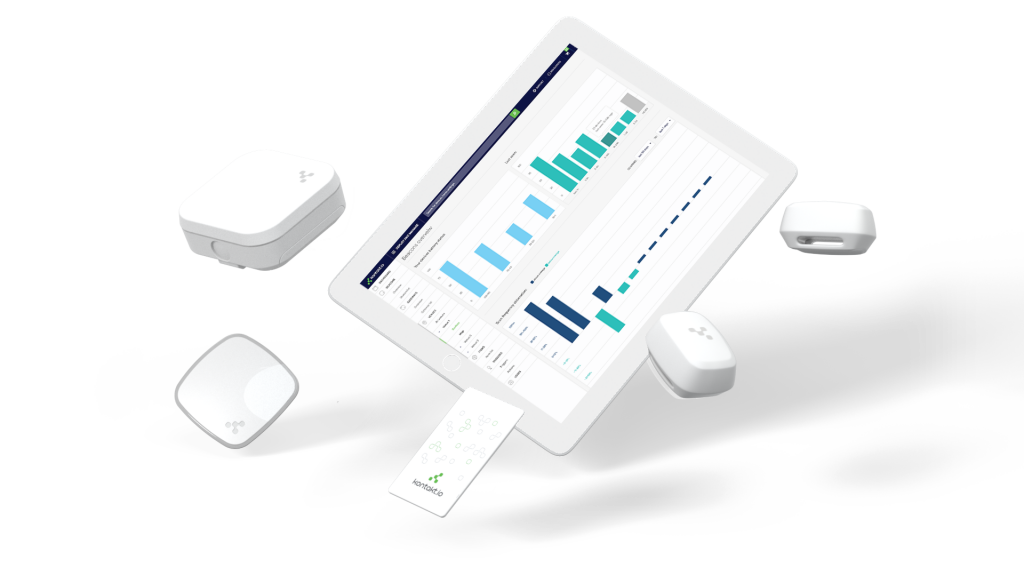
It’s a small USB powered BLE (Bluetooth Low Energy) + WiFi device that allows you to track and monitor BLE devices via a cloud interface or API (Application Programming Interface). Effectively real-time Bluetooth scanning that allows you to also connect your BLE beacons to the cloud. The Gateway works directly with the Kontakt Location Engine via a monthly per unit subscription.

What is the Kontakt Location Engine?

The Kontakt website says that ‘the Location Engine is an API that empowers you to build BLE based asset tracking solutions cheaper and faster’. In my view, it’s actually more than this because it doesn’t just allow you to track assets unless you consider people assets – which in many cases they are but I’d prefer to call them people.

It’s also more than an API because it’s actually a very nicely thought and well-presented web interface that gives you access to a broad range of live and historical data based on the movement of BLE enabled devices. Furthermore and perhaps most importantly, it also allows you to set triggers and then actions based on how BLE enabled devices move, say into or out of range of a Gateway. These triggers and actions can be linked to IFTTT  which makes it a really powerful tool.

What does a Kontakt Gateway + Location Engine do?

In practical terms the device allows you to track, monitor and collect data on assets and people via BLE devices. The Location Engine adds the ability to perform real-time actions based on this data.

Setting them up

So each Gateway has a micro USB port for power, one is provided with the unit, but be warned, it’s pretty short (30cm). Don’t worry however as any micro USB cable will do. At this point, you have 2 options for connecting the Gateway to your local wifi network. The first is via the Kontakt app (you will need to be the owner of the device in the Kontakt panel), the other is to connect the device, via USB, to a PC. Both are pretty straightforward – you basically just need your network SSID and password details. Once the Gateways have been updated with your wifi details the LED on the top of the device will show green once it’s been through its startup cycle.

Don’t forget that the gateways each need a subscription to the Location Engine, you have a couple of options here, quarterly or yearly, the latter attracting a discount.

Creating a venue

In order to make use of your Gateway, you need to create a venue. In my case, I set one up called ‘Web-Feet Office’. You then have the option of uploading a floor plan. A good place to create a nice looking floorplan is Roomsketcher. Once you’ve done that, you apply some dimensions in the Kontakt panel for scaling purposes (each Gateway has a range of about 50m) so that the location engine software can apply the appropriate scale radius zones for the Immediate, Near and Far ranges of the beacons. This is so that you have an accurate depiction of the associated ranges of each beacon and nearby devices.

Adding the Gateways to your venue

Now you’ve uploaded the floorplan you can place your beacons, virtually on the plan to reflect where you have placed them physically within the room. It’s really easy to move them around within the panel, just drag and drop. Nice!

Live Streaming data

So you have your Gateways powered up, connected to your wifi network, your floorplan uploaded and your Gateways virtually postioned on the plan. Now you can start streaming live location data. Click on the big green button to start live streaming data to the screen (it will be paused by default). Please note however that the data is still being collected in the cloud, it’s only the streaming of live data to your screen that is paused.

Screenshot of live streaming data in the Location Engine
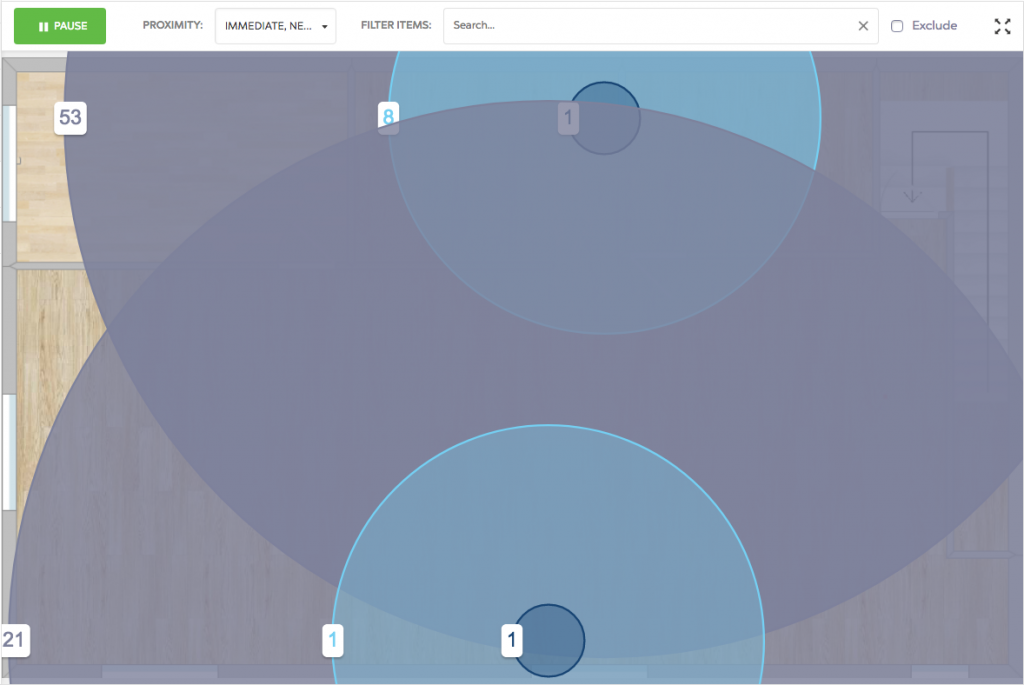
Live streaming on the Location Engine. The number of devices for each proximity range is displayed in each zone.

Once you’ve started live streaming data you will see how many devices (I’ll explain why I say devices and not beacons shortly) are within range of the Gateways, split into 3 concentric circles to signify the Immediate, Near and Far perimeters. This is standard beacon terminology by the way. You have full control over switching each zone on/off on screen depending on what you want to see. If you click on any of the proximity rings, you will see on the right of the dashboard panel a list of the devices that the Gateway can see in real time. This will be either the 4 character identifier for Kontakt beacons or a MAC address if it’s another Bluetooth device, such as a mobile phone or another non-Kontakt beacon.

You can give the devices an alias if you want to make it easier to identify them in the panel. To do this you can just click on the link next to the device and add the alias. This is something I would recommend doing at the outset as much as possible as it makes the data more valuable that way – especially when assigning triggers and actions, more on this later.

Right now your Gateways are set up and busy collecting data which is being stored on the Kontakt cloud.

Analytics

There are quite a few options within the panel to analyse the data being collected by the Gateways. Here’s the data you can report on.

History

This allows you to select a timeframe and then see which BLE devices were within range of a Gateway during that period. You can see by Immediate, Near and Far for each Gateway and filter accordingly.

Dwell Time

This doesn’t strictly show the dwell time for an individual beacon but actually shows you the cumulative total of BLE devices within the specified time period for a Gateway in each of the 3 proximity ranges, Immediate, Near and Far. This allows you to see, up to a minute by minute timeframe how many BLE devices were in the range of a Gateway and how that changes over your selected timeframe. It should be noted that the actual specific dwell time on a BLE device by device basis is available via the API.

Screenshot of device dwell time by gateway
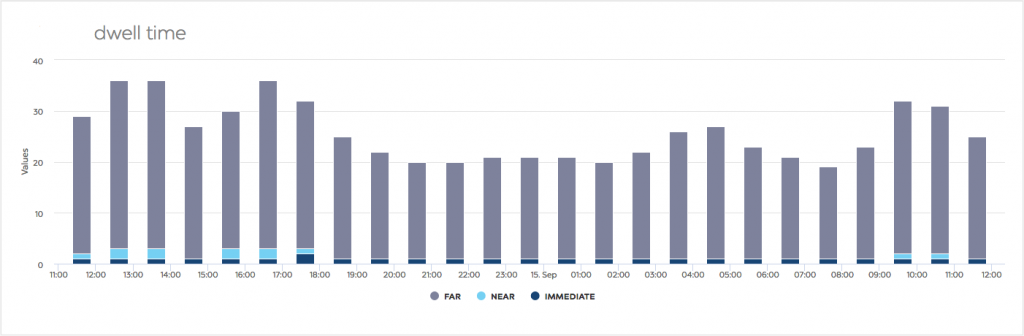
Dwell time for one gateway, hour by hour for a 24 hour period – shows total number of devices stacked by Far, Near and Immediate proximity

Heatmap

This data is actually very similar to the data presented as Dwell time but isn’t broken down by Immediate, Near and Far – just the total number of BLE devices within range of each Gateway during the specified timeframe.

Screenshot of total BLE devices per gateway over 4 x 15 minute period
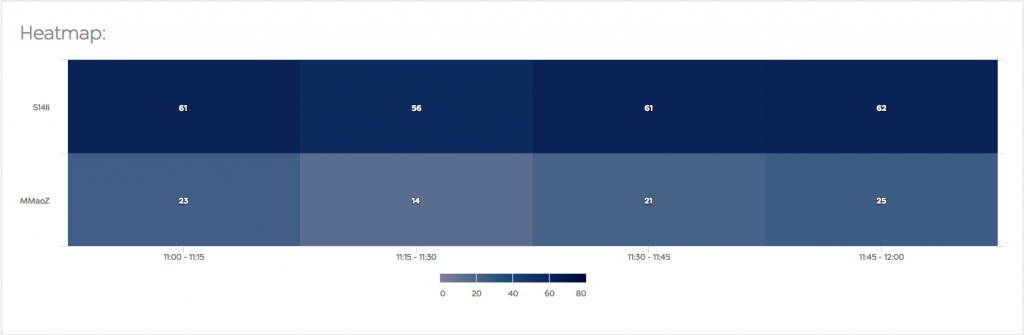
Shows 2 x gateways on the horizontal axis and then 4 x 15 min periods with total BLE devices in range during that time as a ‘heatmap’

Connections

Connections provides you with a complete list of other BLE devices that were near one Gateway but in the perspective of another BLE device. For example: Let’s say that there is a Gateway in a meeting room and there was a meeting scheduled by me at 10:00 am for everyone who would like to join. If say a manager would like to know who attended my meeting, by going to connections, they can search for me (my beacon) and see what other devices were reported by the Gateway at 10:00 am.

Timeline

Timeline shows which devices were in range – Near, Immediate or Far – of any Gateway

This is the most detailed view available in the Analytics suite and lists each individual device that is in range of any Gateway for the specified time period, broken down by Gateway. This is a good example also of how an alias is really useful for a Kontakt beacon – see top to entries whereby both my beacon and Taylor’s beacon are in range of both Gateways for the entire period being displayed. Beacon NyTM however was in range of Gateway S14li for the entire period but only in range of Gateway MMaoZ during the period 11:45 – 12:00 and 12:15 – 12:30

Screenshot of the Timeline output in the analytics panel
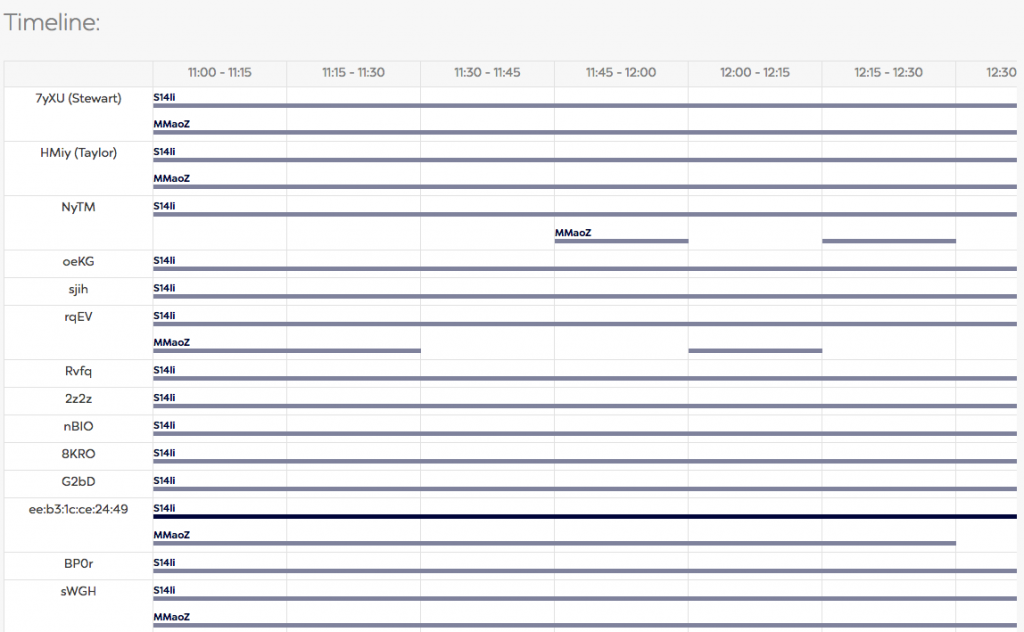
Timeline shows each device on the horizontal axis and how it was detected by our two Gateways during the selected period.

Triggers and Actions

Triggers are a really powerful feature of the Gateway + Location Engine. They are also incredibly easy to set up. First of all, you name your action – in this example, I’ve set up a trigger called ‘Beacon detected’. You then choose the type of trigger – this can be ‘Beacon detected’ or ‘Beacon lost’. In this exampl, I have used ‘Beacon detected’. Executor can be Cloud, Gateway or Proximity SDK. This allows you to define what part of the solution triggers the action and for this example, as I’m using the Cloud based features, it will be the Cloud. The tracking ID is the ID of the Kontack BLE beacon I want to use to trigger the action. You also configure the proximity range that you want to use for the trigger (this is obscured in the screenshot by the Type drop down). In this case I’ve set this trigger to ‘Near’.  Finally, the source ID is the ID of the Gateway that you want to use to trigger the action. This is all you have to do to set up a trigger.

Screenshot of where you set triggers up in the web panel
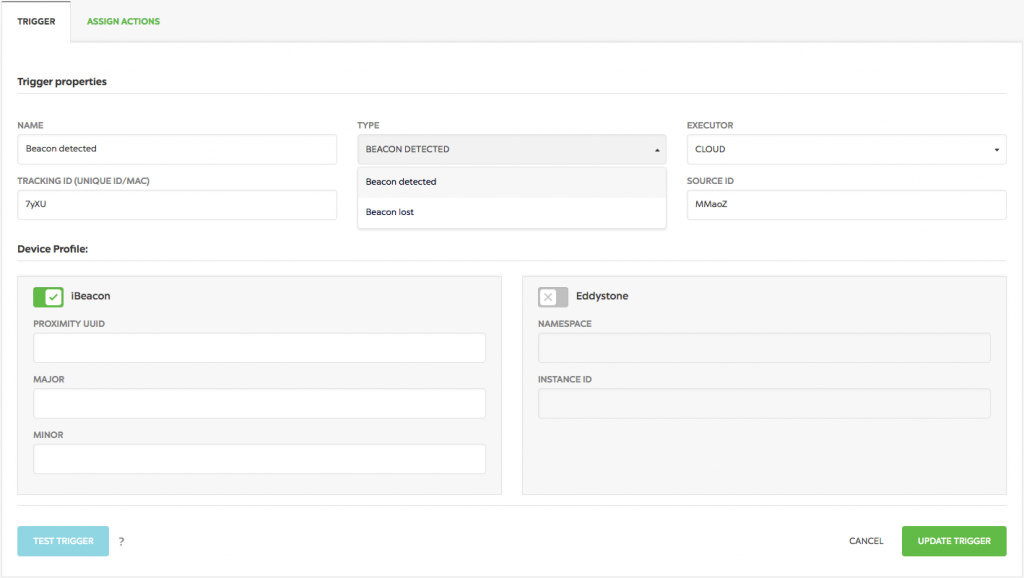
This is where you set up your triggers within the Location Engine web panel

Once you’ve set up the trigger, you can click on the tab to assign an action to it. In this instance I’ve created an action called ‘Stewart entered office’. So basically, this is a beacon that’s assigned to me and the trigger is set up so that when I come within ‘Near’ range of the (specified) gateway the action is triggered. The action in this case is to Send HTTP request. The content of the request is to trigger an IFTTT action. Kontakt have a useful guide on their website explaining how this works – you can see it here.

In this case the IFTTT action is to simply send an email when the action is triggered informing the recipient that the action has been triggered (and Stewart has entered the office).

Screenshot of assigning actions to trigger
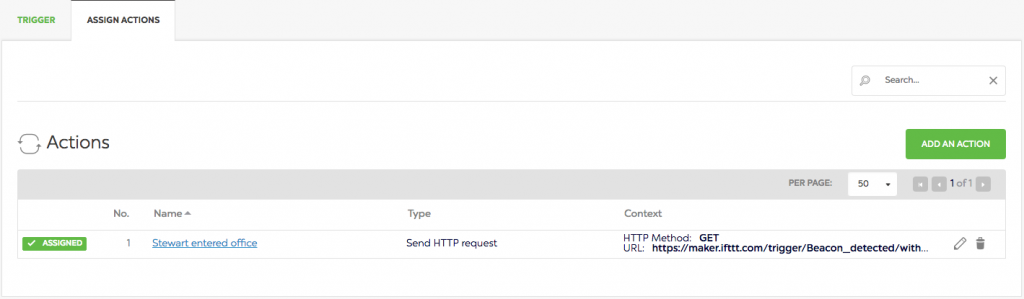
This is where you set up the actions associated with the triggers you’ve set up in the web panel

The Location Engine API

I want to mention this specifically because the data that is presented with in the Location Engine web panel is only a subset of all the data that is available via Kontakt’s API. The data presented via the web panel is designed to show enough data to provide a really robust, useful and cost effective solution straight out of the box. It’s also pretty easy to set up. This means that there is a whole lot of additional data and analytics that can be accessed using the API. This would require a developer but also offers a whole lot more customisation options. That’s outside the scope of this article however.

Summary

Kontakt has produced a really solid solution with the Gateway + Location Engine. It’s a very powerful solution that’s really easy to set up and make use of straight away. The ability to track assets, set up alerts and trigger actions as well as collect data offers opportunities that would otherwise be very expensive or very difficult to set up. With a huge amount of additional capability available through the API many more complex solutions are possible.
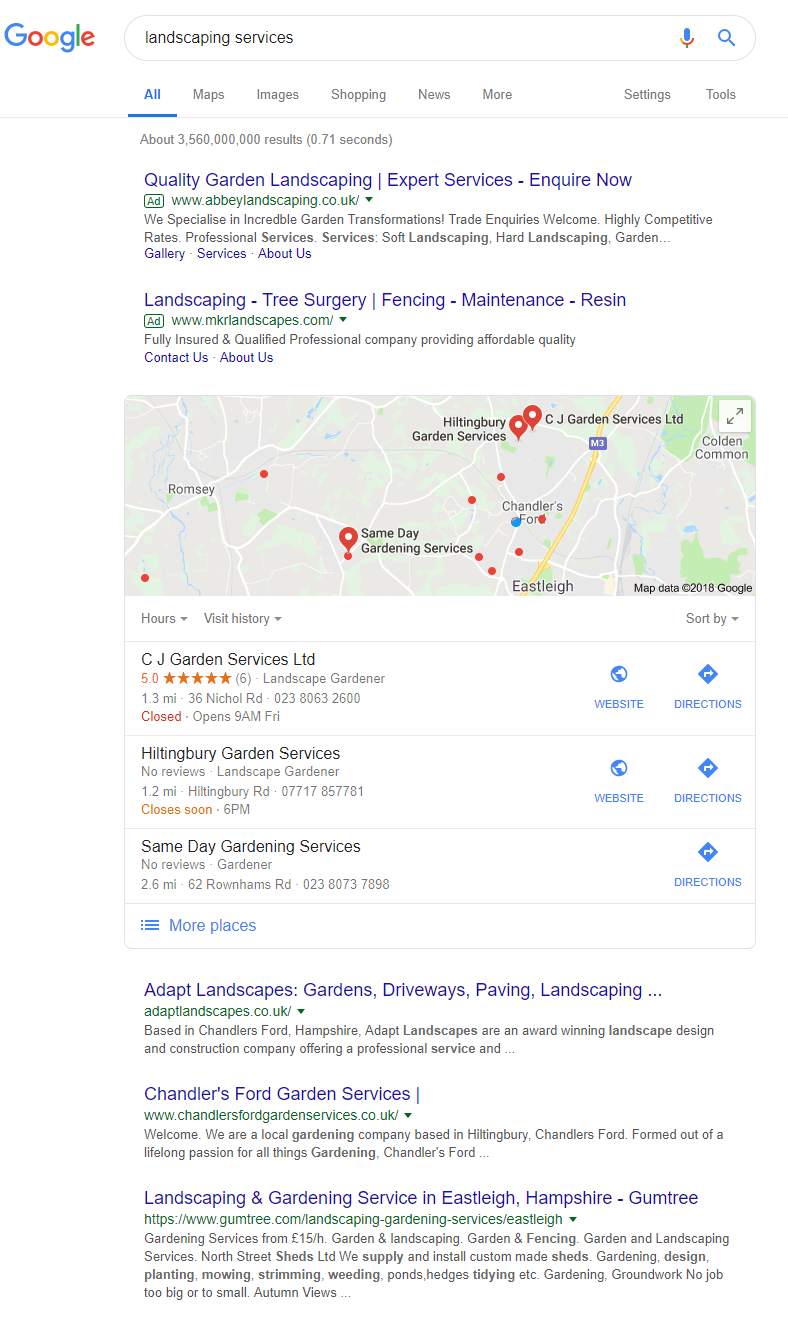
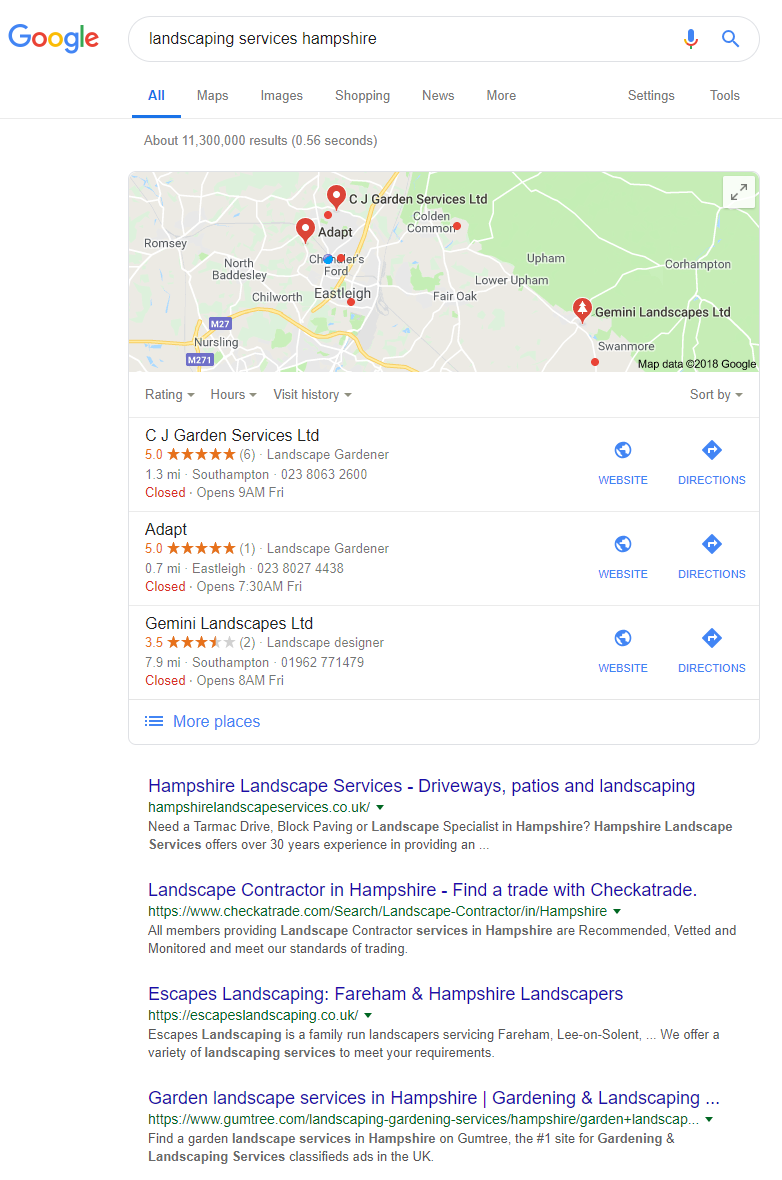

Some of our happy customers

logo ahmad
logo poingdestres
logog swiss
logo ibhs 1
ww
logo sgc
logo nationwide
logo undersea
logo roughton
logo stcross
logo pulse
logo mm
logo jfl
logo heritage 1
logo firesafe
logo electrofreeze
logo clickmetal
logo baguetti
bpc
logo ccc 1
log arokah
logo labs
logo paragon
logo trant
logo nahh
logo edge
logo romsey
ace1
ace2
spaceway logo
logo bookharbour
logo chartco
logo cranbourne
logo magister
logo mgmetals
logo westway
logo ocean
logo testvalley
logo brittania
logo faac
recref
logo gss