Tech Archives -

Magento 1 vs Magento 2

Posted on October 5, 2017 by

Magento 1 vs Magento 2

Magento 2 is the latest version of the most popular ecommerce platform in the world. Currently holding 14% of the market share for ecommerce platforms, it’s safe to say the Magento upgrade has been a pretty big deal for ecommerce businesses.

The key defining feature of Magento 1 is it’s flexibility. Users can create stores with a variety of functions using pre-made extensions or by utilising the coding skills of their developers. This flexibility leads to a better shopping experience, with plenty of useful features and innovation opportunities for both B2B and B2C businesses. This is one of the key reasons why Magento is so popular.

However, despite this flexibility, Magento 1 is not the most user-friendly platform. It lacks performance optimisation, mobile-responsiveness, and some admin capabilities that every online store needs. These essential features aren’t part of the Magento 1 package and would need to be developed by a skilled Magento developer. There have also been many complaints of Magento 1 running slow, which isn’t ideal for an ecommerce site.

To address these issues, the Magento team designed an upgraded platform: Magento 2.

Magento 2 comes with features that make it a better platform overall. The major changes for Magento 2 include the following:
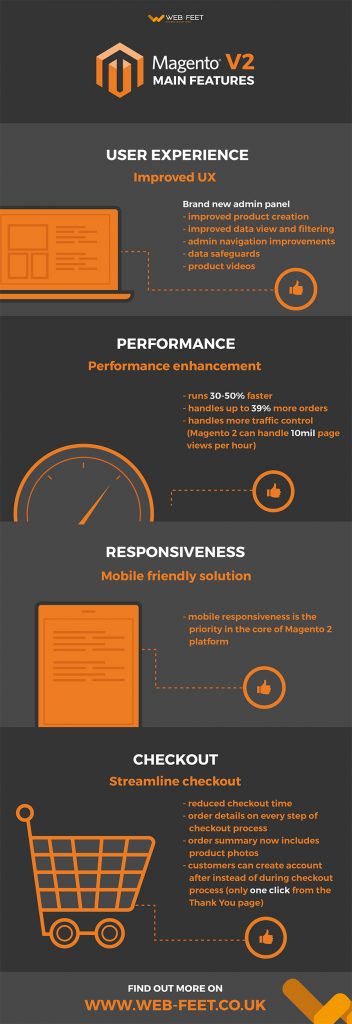
features of majento 2

Improved UX

The admin panel of Magento 1 is notoriously difficult to navigate and not user friendly. Thankfully, the team at Magento decided to address this issue head on with Magento 2.

One of the most obvious changes and welcomed to the second edition of Magento is its brand new admin panel. The new admin interface is designed to help reduce the time managing the online store. It’s a lot more user-friendly and easier to get to grips with.

Magento 2’s administrative improvements and new capabilities include:

  1. Improved product creation: The new step-by-step product creation tools allow you to add products to your store up to 4 times faster than in Magento 1.
  2. Improved data view and filtering: Admin are able to customise the new grid-style admin panel so important business information can be accessed quickly. The personalised admin panel is designed to increase productivity when managing products, orders, and customer data. This means you are welcomed with a clean, de-cluttered user interface that offers the information you need. Magento has also added the ability to quickly filter data based on any of the attributes that have been enabled in your data view.
  3. Admin navigation improvements: Overall the admin interface is cleaner and less cluttered. Menus are more organised so that finding the page and functionality that you are seeking is much simpler. These improvements lead to a smaller learning curve and quicker productivity for administrators.
  4. Data safeguards: Magento 1 was designed for a single user admin to be manipulating product data at a single time. This is troublesome for larger sites that might have multiple administrators to work on product data simultaneously, thus making your team more efficient and allowing you to more easily keep your store’s products up to date. Magento have addressed this issue with Magento 2.
  5. Product videos: Adding videos from YouTube or Vimeo is now very simple and supported by Magento 2. This offers a great opportunity to properly merchandise your products and add some engaging video content to your site.

The admin interface of Magento 2 also now includes drag-and-drop layout editing, meaning users don’t need extensive coding knowledge to modify an online store’s appearance. This means you can create a beautiful online store in half the time.

Streamlined checkout

The majority of Magento 1 stores had to alter the checkout process in some way to make it more user-friendly. Now, better checkout options are built into Magento 2. This means every store built with Magento 2 will by default have a more intuitive checkout process.

The checkout process in Magento 2 is more streamlined, making it quicker and easier for customers to go from adding items to their cart to completing an order. It’s highly customisable and requires fewer complicated steps and customer information. Reducing the checkout time is huge for reducing abandoned carts and increasing conversions, so this is a great improvement for both customers and business owners.

Magento have also simplified customer registration by allowing customers to create an account after ordering instead of during the checkout process. When a customer goes to checkout, they are brought to a default guest checkout screen where they enter an email address. If this matches an existing customer, they are given an option to checkout faster with saved information. Guests can create an account in one click from the order Thank You page. These features which simplify the order process encourage customers to return to your site and make purchases. Fewer confusing choices and fewer forms means a significant increase in conversions as customers focus on what matters: finishing the checkout process.

The new checkout also includes order details on every step, offering greater transparency to help put your customers at ease. The order summary in Magento 2 now includes product photos. This reduces ordering errors which cuts down on returns and increases buyer confidence that leads to higher conversions.


the benefits of magento 2

More mobile-friendly

As more and more customers are shopping on smartphones and tablets, mobile responsiveness is key to improving sales. In fact, 50% of online transactions are now performed on mobile devices. The Magento team recognised this and made mobile responsiveness a priority for Magento 2.

Magento 2 comes with new responsively designed and SEO-friendly themes, integrated video features and a streamlined checkout. These all improve the look and function of Magento stores on mobile devices, thus encouraging mobile sales. A much more streamlined, mobile-friendly checkout and faster performance will result in a much higher conversion rate for your mobile shoppers.

The new admin panel is also responsive and touch-screen friendly so you can manage your store on the go. This enhancement ensures easier control and configuration of the online store. This is great for merchants who work with their CMS via iPads or tablets – make changes in the office, on the train or at home.

Performance enhancement

Magento 2 was designed with performance in mind. The developers behind Magento have achieved this through utilising the following technical improvements:

  1. Ajax cart: Magento 2 uses JavaScript to add items to the shoppers cart without reloading the entire page, putting less load on your hosting hardware resulting in a more responsive experience and a faster checkout time for your shoppers.
  2. Cache: Magento 2’s improved caching system stores commonly accessed page elements to serve them faster to your visitors, and now includes support for caching technologies like Varnish (a popular HTTP accelerator).
  3. PHP 7: PHP is the programming language that Magento is built with. Magento 2 is optimised for PHP 7, which provides superior performance to previous PHP versions.
  4. Hosting environment improvements: Magento 2 includes new features and functionality that allows you to more easily spread the demand on your hosting infrastructure over multiple servers, which makes handling large traffic spikes much easier.

Magento 2 will run an average of 30% to 50% faster than it’s predecessor. Faster site speed encourages more user interaction with your site and more products added to your site’s cart, leading to more sales and fewer abandoned carts.

The latest Magento version can handle up to 39% more orders per hours with 66% faster add-to-cart times that Magento 1. It can also better handle many catalogue pages without slowing down, with a nearly instant server response time for catalogue browsing.

Magento 2’s improved functionality also means it can handle more traffic. Magento 2 can manage 10 million page views an hour, whereas Magento 1 can only process 200,000. This makes it ideal for large stores and able to grow with an online business.

In addition to all of these fantastic new features, updates within Magento 2 are designed to work a lot quicker, making it easy for Magento users to take advantage of new features as they’re released.

Key payment integrations

As we’ve mentioned, Magento 2 integrates a lot of popular extensions so stores have better functionality out of the box. This includes payment gateways like PayPal and Braintree. These are payment platforms the majority of Magento users choose to integrate anyway, so having them already integrated into Magento 2 makes it a lot easier for store owners.

Magento 2’s integration with PayPal means customers do not need to re-enter payment information such as a billing address as this is handled by PayPal, another development which makes the checkout process smoother and quicker.

There are also integrations with Worldpay and Cybersource to increase payment security, so customers can rest assured that their payments are safe and secure.

So, Magento 2 – have you been persuaded to transition?

Web-Feet have certified Magento developers who are eager and ready to help ease this transition. Let us help give your customers the benefit of Magento 2’s new features.

Although some have reservations about moving to Magento 2, it’s clear this platform was designed to provide a better experience for both customers, store owners and administrators. It maintains the flexibility Magento is known for, but with improved features.

What’s more, soon Magento 1 security updates will be stopping, so all Magento ecommerce site owners will have to move over to Magento 2 sooner or later.

If you’re thinking about moving your ecommerce site over to Magento 2, or creating one from scratch our team of expert Magento developers are here to help.

Contact Us


Proximity Marketing for the Tourism Industry

Posted on September 26, 2017 by

On average, we check our phones a whopping 150 times a day. This offers a huge number of opportunities for savvy marketers to target us with products.

Marketers know that providing personalised content to end users is critical to increase engagement. We are constantly bombarded with information, which makes filtering what’s important or relevant to us hard. One thing’s for certain – users will engage with content much better when this is done for them.

This concept isn’t new and is used increasingly in end user communications. However, what’s been missing in the past is the physical or location based element to this puzzle. Many websites contain lots of useful information but filtering through this to get to the information you need – especially on a mobile device – is often cumbersome and frustrating.

Bluetooth beacons solve this problem.

Beacons broadcast content that is specific to a physical location. This means that end users get access to what’s relevant and useful to them specific to wherever they may be – whether they’re at an airport, in a hotel, at a tourist location or a shop. Considering ‘near-me’ searches have doubled in the last year, the location specific content has become more important now than ever. It’s expected that 70% of retail companies will use beacons over the next 5 years.

Take a minute to think about the possibilities that beacons offer and you’ll realise powerful this concept is – to be notified of location specific content. Imagine standing outside a famous landmark and receiving a notification on your smartphone, alerting you to a nearby cafe along with a 25% discount – you’d probably swing by and purchase something, wouldn’t you? Offers, maps, and other important information can be all broadcasted via Bluetooth beacons, making the possibilities endless.bluetooth beacons

These beacons enable you to create micro-moments with your customers: these are critical touch points within the consumer journey which, when added together ultimately determine how that journey ends. Micro-moments are all about anticipating your customers needs in a specific physical location, and taking action to provide them with the information they need. Do they need directions? Tourist information?

All the technology exists today to make these location specific micro-moments possible, but it can be hard to know where to start.

This is where Coaster CMS comes in.

Coaster CMS is a next generation, beacon enabled Content Management System. It has been built from the ground up to make the management of content easy for the website owner. It’s beacon enabled with support for both Kontakt and Estimote beacons, and has innovative features that make it the perfect platform to build both static and location based content.

As Coaster CMS was built from the ground up to make use of beacons, it allows different content to be displayed at different times of day. Imagine being able to not only build amazing static and location based content, but also choose the times of day, day of week, or even hour of the day, that different content is displayed – pretty handy, right?

Even if you aren’t ready to move directly into location enabled content, Coaster is an extremely capable CMS in its own right. As such it future proofs your content and serves as a platform to build location based and time specific content as and when you are ready to deploy beacons.

Bluetooth proximity beacons are a technology that will revolutionise our use of the internet, so contact us today to find out how you can make use of this technology now and get yourself ready for the Physical Web.

Coaster CMS is a next generation CMS built from the ground up by Web-Feet, an innovative digital agency based near Southampton in Hampshire. Being an agency we serve the needs of our clients and Coaster reflects this by combining the latest technology but with a focus on usability.

To read a bit more about Beacons in tourism;

http://www.ibeacontrends.com/ibeacons-event-industry/

http://www.ibeacontrends.com/yorkshire-wildlife-park-ibeacons/

http://www.ibeacontrends.com/beacon-installation-gatwick-airport/

http://www.ibeacontrends.com/ljmu-beacons-use/

http://www.ibeacontrends.com/lighthouse-city-guide/

http://www.ibeacontrends.com/beacons-levis-stadium/


Setting up the Kontakt Gateway + Location Engine with Proximity Beacons

Posted on September 26, 2017 by

Promotional graphic of Kontakt Location Engine

Introduction

This article will detail how we set up and used Kontakt’s Gateway + Location engine with Bluetooth Proximity Beacons – We’ve worked with Kontakt’s range of Bluetooth Proximity beacons for a while now but it was some time ago that we received our Gateways but never got around to setting them up, until now! Part of the reason for this has been that we’ve been really busy on customer projects and the other is because we thought it might take a while, this couldn’t have been further from the truth as it turns out.

So, we’ve set two Gateways up at our offices in Southampton in the UK and these are both subscribed to Kontakt’s Location Engine. Here’s a summary of how to set them up and what you can do with them. But first…

What is a Kontakt Gateway?

It’s a small USB powered BLE (Bluetooth Low Energy) + WiFi device that allows you to track and monitor BLE devices via a cloud interface or API (Application Programming Interface). Effectively real-time Bluetooth scanning that allows you to also connect your BLE beacons to the cloud. The Gateway works directly with the Kontakt Location Engine via a monthly per unit subscription.

What is the Kontakt Location Engine?

The Kontakt website says that ‘the Location Engine is an API that empowers you to build BLE based asset tracking solutions cheaper and faster’. In my view, it’s actually more than this because it doesn’t just allow you to track assets unless you consider people assets – which in many cases they are but I’d prefer to call them people.

It’s also more than an API because it’s actually a very nicely thought and well-presented web interface that gives you access to a broad range of live and historical data based on the movement of BLE enabled devices. Furthermore and perhaps most importantly, it also allows you to set triggers and then actions based on how BLE enabled devices move, say into or out of range of a Gateway. These triggers and actions can be linked to IFTTT  which makes it a really powerful tool.

What does a Kontakt Gateway + Location Engine do?

In practical terms the device allows you to track, monitor and collect data on assets and people via BLE devices. The Location Engine adds the ability to perform real-time actions based on this data.

Setting them up

So each Gateway has a micro USB port for power, one is provided with the unit, but be warned, it’s pretty short (30cm). Don’t worry however as any micro USB cable will do. At this point, you have 2 options for connecting the Gateway to your local wifi network. The first is via the Kontakt app (you will need to be the owner of the device in the Kontakt panel), the other is to connect the device, via USB, to a PC. Both are pretty straightforward – you basically just need your network SSID and password details. Once the Gateways have been updated with your wifi details the LED on the top of the device will show green once it’s been through its startup cycle.

Don’t forget that the gateways each need a subscription to the Location Engine, you have a couple of options here, quarterly or yearly, the latter attracting a discount.

Creating a venue

In order to make use of your Gateway, you need to create a venue. In my case, I set one up called ‘Web-Feet Office’. You then have the option of uploading a floor plan. A good place to create a nice looking floorplan is Roomsketcher. Once you’ve done that, you apply some dimensions in the Kontakt panel for scaling purposes (each Gateway has a range of about 50m) so that the location engine software can apply the appropriate scale radius zones for the Immediate, Near and Far ranges of the beacons. This is so that you have an accurate depiction of the associated ranges of each beacon and nearby devices.

Adding the Gateways to your venue

Now you’ve uploaded the floorplan you can place your beacons, virtually on the plan to reflect where you have placed them physically within the room. It’s really easy to move them around within the panel, just drag and drop. Nice!

Live Streaming data

So you have your Gateways powered up, connected to your wifi network, your floorplan uploaded and your Gateways virtually postioned on the plan. Now you can start streaming live location data. Click on the big green button to start live streaming data to the screen (it will be paused by default). Please note however that the data is still being collected in the cloud, it’s only the streaming of live data to your screen that is paused.

Screenshot of live streaming data in the Location Engine
Live streaming on the Location Engine. The number of devices for each proximity range is displayed in each zone.

Once you’ve started live streaming data you will see how many devices (I’ll explain why I say devices and not beacons shortly) are within range of the Gateways, split into 3 concentric circles to signify the Immediate, Near and Far perimeters. This is standard beacon terminology by the way. You have full control over switching each zone on/off on screen depending on what you want to see. If you click on any of the proximity rings, you will see on the right of the dashboard panel a list of the devices that the Gateway can see in real time. This will be either the 4 character identifier for Kontakt beacons or a MAC address if it’s another Bluetooth device, such as a mobile phone or another non-Kontakt beacon.

You can give the devices an alias if you want to make it easier to identify them in the panel. To do this you can just click on the link next to the device and add the alias. This is something I would recommend doing at the outset as much as possible as it makes the data more valuable that way – especially when assigning triggers and actions, more on this later.

Right now your Gateways are set up and busy collecting data which is being stored on the Kontakt cloud.

Analytics

There are quite a few options within the panel to analyse the data being collected by the Gateways. Here’s the data you can report on.

History

This allows you to select a timeframe and then see which BLE devices were within range of a Gateway during that period. You can see by Immediate, Near and Far for each Gateway and filter accordingly.

Dwell Time

This doesn’t strictly show the dwell time for an individual beacon but actually shows you the cumulative total of BLE devices within the specified time period for a Gateway in each of the 3 proximity ranges, Immediate, Near and Far. This allows you to see, up to a minute by minute timeframe how many BLE devices were in the range of a Gateway and how that changes over your selected timeframe. It should be noted that the actual specific dwell time on a BLE device by device basis is available via the API.

Screenshot of device dwell time by gateway
Dwell time for one gateway, hour by hour for a 24 hour period – shows total number of devices stacked by Far, Near and Immediate proximity

Heatmap

This data is actually very similar to the data presented as Dwell time but isn’t broken down by Immediate, Near and Far – just the total number of BLE devices within range of each Gateway during the specified timeframe.

Screenshot of total BLE devices per gateway over 4 x 15 minute period
Shows 2 x gateways on the horizontal axis and then 4 x 15 min periods with total BLE devices in range during that time as a ‘heatmap’

Connections

Connections provides you with a complete list of other BLE devices that were near one Gateway but in the perspective of another BLE device. For example: Let’s say that there is a Gateway in a meeting room and there was a meeting scheduled by me at 10:00 am for everyone who would like to join. If say a manager would like to know who attended my meeting, by going to connections, they can search for me (my beacon) and see what other devices were reported by the Gateway at 10:00 am.

Timeline

Timeline shows which devices were in range – Near, Immediate or Far – of any Gateway

This is the most detailed view available in the Analytics suite and lists each individual device that is in range of any Gateway for the specified time period, broken down by Gateway. This is a good example also of how an alias is really useful for a Kontakt beacon – see top to entries whereby both my beacon and Taylor’s beacon are in range of both Gateways for the entire period being displayed. Beacon NyTM however was in range of Gateway S14li for the entire period but only in range of Gateway MMaoZ during the period 11:45 – 12:00 and 12:15 – 12:30

Screenshot of the Timeline output in the analytics panel
Timeline shows each device on the horizontal axis and how it was detected by our two Gateways during the selected period.

Triggers and Actions

Triggers are a really powerful feature of the Gateway + Location Engine. They are also incredibly easy to set up. First of all, you name your action – in this example, I’ve set up a trigger called ‘Beacon detected’. You then choose the type of trigger – this can be ‘Beacon detected’ or ‘Beacon lost’. In this exampl, I have used ‘Beacon detected’. Executor can be Cloud, Gateway or Proximity SDK. This allows you to define what part of the solution triggers the action and for this example, as I’m using the Cloud based features, it will be the Cloud. The tracking ID is the ID of the Kontack BLE beacon I want to use to trigger the action. You also configure the proximity range that you want to use for the trigger (this is obscured in the screenshot by the Type drop down). In this case I’ve set this trigger to ‘Near’.  Finally, the source ID is the ID of the Gateway that you want to use to trigger the action. This is all you have to do to set up a trigger.

Screenshot of where you set triggers up in the web panel
This is where you set up your triggers within the Location Engine web panel

Once you’ve set up the trigger, you can click on the tab to assign an action to it. In this instance I’ve created an action called ‘Stewart entered office’. So basically, this is a beacon that’s assigned to me and the trigger is set up so that when I come within ‘Near’ range of the (specified) gateway the action is triggered. The action in this case is to Send HTTP request. The content of the request is to trigger an IFTTT action. Kontakt have a useful guide on their website explaining how this works – you can see it here.

In this case the IFTTT action is to simply send an email when the action is triggered informing the recipient that the action has been triggered (and Stewart has entered the office).

Screenshot of assigning actions to trigger
This is where you set up the actions associated with the triggers you’ve set up in the web panel

The Location Engine API

I want to mention this specifically because the data that is presented with in the Location Engine web panel is only a subset of all the data that is available via Kontakt’s API. The data presented via the web panel is designed to show enough data to provide a really robust, useful and cost effective solution straight out of the box. It’s also pretty easy to set up. This means that there is a whole lot of additional data and analytics that can be accessed using the API. This would require a developer but also offers a whole lot more customisation options. That’s outside the scope of this article however.

Summary

Kontakt has produced a really solid solution with the Gateway + Location Engine. It’s a very powerful solution that’s really easy to set up and make use of straight away. The ability to track assets, set up alerts and trigger actions as well as collect data offers opportunities that would otherwise be very expensive or very difficult to set up. With a huge amount of additional capability available through the API many more complex solutions are possible.


The Future of Virtual Reality

Posted on October 25, 2016 by

The Future of Virtual Reality

Conventionally, virtual reality headsets have been incredibly expensive – costing well into the hundreds of pounds. Not only is the headset itself expensive you also need a computer powerful enough to run games smoothly, potentially adding thousands of pounds onto your bill. Unfortunately, this high cost of entry presents a barrier to many people who are looking to get into the world of VR. Fortunately, PlayStation has jumped onto the VR bandwagon with the upcoming release of PlayStation VR – a somewhat more affordable alternative.

Continue reading →


Apple Pay for eCommerce, Creating a Leaner Checkout

Posted on September 28, 2016 by

Apple Pay

What is it?

Apple Pay for eCommerce websites is here. This month sees the release of macOS Sierra and iOS 10, bringing with it many new features. The most interesting, in our opinion, being the availability of Apple Pay on the web. This opens an interesting new dimension to online shopping and eCommerce. Customers can now order items with the touch of a button by using Touch ID on their iPhone, iPad or Apple Watch. This presents a great opportunity for shop owners that use an eCommerce platform.

Continue reading →


How to Get Your Brand Started with Snapchat.

Posted on June 17, 2016 by

Should I explore Snapchat no matter what? YES!

The stats behind it also supports this with 150 million daily active users and over 10 billion daily video views, it’s hard to believe that Snapchat is still growing. But, it is particularly with users over 25. According to Snapchat’s Senior Vice President, Nick Bell, two-thirds of their audience is over 18, with 50 percent of new daily users over the age of 25.

If your brand isn’t on Snapchat yet, then what are you waiting for? It’s one of the best digital tools available for marketers to engage in a face-to-face style communication with all your brand fans.

Snapchat

Continue reading →


Over 23% Of Users Dropped An App After Single Use

Posted on June 6, 2016 by

Almost 1 in 4 users or 23% of the users, identified from over 2.7 billion devices and 37,000 mobile applications, abandoned an app after a single use in 2016.

Research by analytics firm Localytics suggested that last year that number stood at 25%. Even though there was a drop in the number of people ditching an app after the very first usage when compared to last year, the study says, “not enough has been done to match what consumers want and restore apps to the success of just a few years ago”.

Mobile Apps

Continue reading →


What Does Google’s Recent Announcements Mean?

Posted on May 27, 2016 by

Google has recently held a large selection of events and announced some cool interesting features being released. Whilst there were no massive surprises updates were in line with recent tests seen in the wild) there’s still work for marketers to do to understand their impact.

Here’s a summary of things to look out for in the coming weeks and months.


Pins Set To Change Maps UI?

Below is a shot showing a Starbucks pin along with a page preview at the bottom and a familiar directions button. Google didn’t add detail to how these pins would work but initially they’ll undoubtedly be just a pin, with the user needing to tap on the map to view more.

Could it be that route options may eventually offer to find points along a journey for me to eat or shop, you could call it a tailored adventure?

promoted pin Google maps

Continue reading →


6 Mistakes That Turn Mobile Customers Away

Posted on May 26, 2016 by

Think of the online customer as a spoilt child – and that child doesn’t like waiting. A delay in delivering a mobile friendly website causes them havoc, rushing away as if you have the plague – all this happens because of a few schoolboy errors.

The digital generation has no patience for disappointment in user experience. They want it now, they want it their way. We’ve identified six issues that are particularly annoying for mobile users, and any one of these mistakes could drive visitors away from your site.

6 Mistakes that Turn Mobile Customers Away

  1. Your website simply fails to load

Even the giants of American marketing sometimes fall short in the most basic ways, by making sites that entirely fail to appear on mobile devices. Although visibility into the mobile UX can be challenging ‒ especially when you factor in the sheer number of mobile devices and the slowness and inaccuracy of many mobile testing tools, it’s no excuse for making a site that doesn’t work at all on mobiles.

Doritos recently had a high profile campaign designed to leverage the excitement surrounding the Batman vs. Superman movie – but it didn’t go to plan, as it did not work at all on mobiles. Can anything be sadder than pouring buckets of money into a high-profile campaign, only to have it not appear? All that money created irritation, not excitement.

Tip: Make sure your website displays on all market-leading phones or tablets!

Continue reading →


Some of our happy customers

logo ahmad
logo poingdestres
logog swiss
logo ibhs 1
ww
logo sgc
logo nationwide
logo undersea
logo roughton
logo stcross
logo pulse
logo mm
logo jfl
logo heritage 1
logo firesafe
logo electrofreeze
logo clickmetal
logo baguetti
bpc
logo ccc 1
log arokah
logo labs
logo paragon
logo trant
logo nahh
logo edge
logo romsey
ace1
ace2
spaceway logo
logo bookharbour
logo chartco
logo cranbourne
logo magister
logo mgmetals
logo westway
logo ocean
logo testvalley
logo brittania
logo faac
recref
logo gss